Why Change the Default WordPress Database Prefix?
Without a database, WordPress would be an empty shell. All content and settings for your posts, pages, themes, and plugins are stored in your database. For this reason, your WordPress database is a huge target. Hackers have developed SQL injections, automated scripts, and other malicious code that are specifically designed to attack your WordPress database.
When installing WordPress, most people tend to leave the database prefix at the default setting of “wp_“. This is not a good idea. Automated scripts that target the WordPress database aim for these default table names during their attacks.
Nothing is foolproof, but you can add an extra layer of protection to your website’s database by simply changing the default WordPress table prefix. Doing this will take you off the radar for automated scripts and make it very hard for a hacker to guess.
Change the Default Database Prefix While Installing WordPress
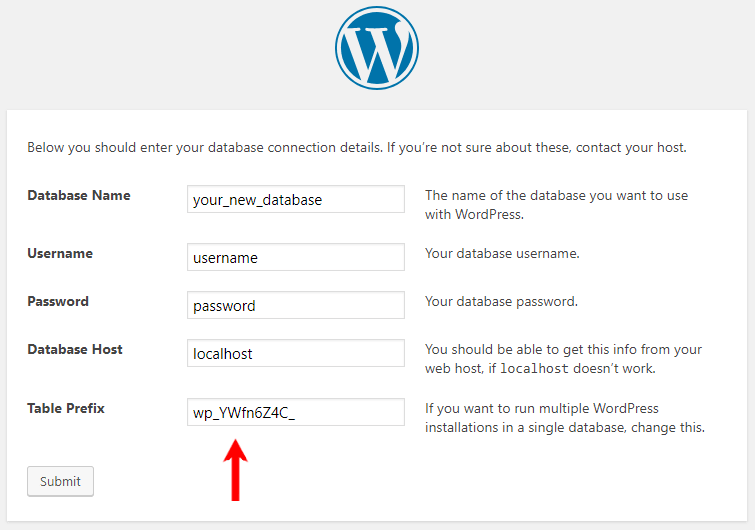
The easiest way to change the default table prefix is when you are first installing WordPress. During the installation, you will come to a page like the one pictured below. On this page, you will be given an option to change the table prefix.
In the picture above, I have named the database prefix “wp_YWfn6Z4C_“. You are free to name the prefix whatever you want. Just keep in mind, only numbers, letters and underscores are allowed. I also recommend that you end the prefix with an underscore (“_“) so the table names (e.g. users, post, options) stand out and are easily recognizable.
Change the Default Database Prefix After Installing WordPress
If you have already installed WordPress, you will need to make a small edit to your wp-config.php file and manually change the database prefixes inside phpMyAdmin. Below, I will show you step-by-step how to do this.
Step 1: Backup Your Database (Very Important)
I can’t stress enough how important this is. When you are making changes to your database one small typo could completely break your website. There are two ways you can get a backup of your database. You can manually download a backup of your database in phpMyAdmin, or you can use a plugin that backs up your database, site files, or both.
Related: Check out the Best WordPress Backup Plugins (and our top pick)
Step 2: Edit Your wp-config.php File
The wp-config.php file is located in the root directory of your website. To edit your wp-config.php you will need to login to your cPanel File Editor, or use an FTP solution like Filezilla. You will need to change the table prefix “wp_” to something random.
/**
 * WordPress Database Table prefix.
 *
 * You can have multiple installations in one database if you give each
 * a unique prefix. Only numbers, letters, and underscores please!
 */
$table_prefix = 'wp_YWfn6Z4C_';
I have named the database prefix “wp_YWfn6Z4C_“. You are free to name the prefix whatever you want. Just keep in mind, only numbers, letters and underscores are allowed. I also recommend that you end the prefix with an underscore (“_“) so the table names (e.g. users, post, options) stand out and are easily recognizable.
Step 3: Rename All WordPress and Plugin Database Tables
In this step, you will need to rename all the table prefixes to match the one you specified in the wp-config.php file.
- Login to your cPanel and click the phpMyAdmin icon.
- Navigate to the database you would like to change.
- Click the checkbox to select all tables.
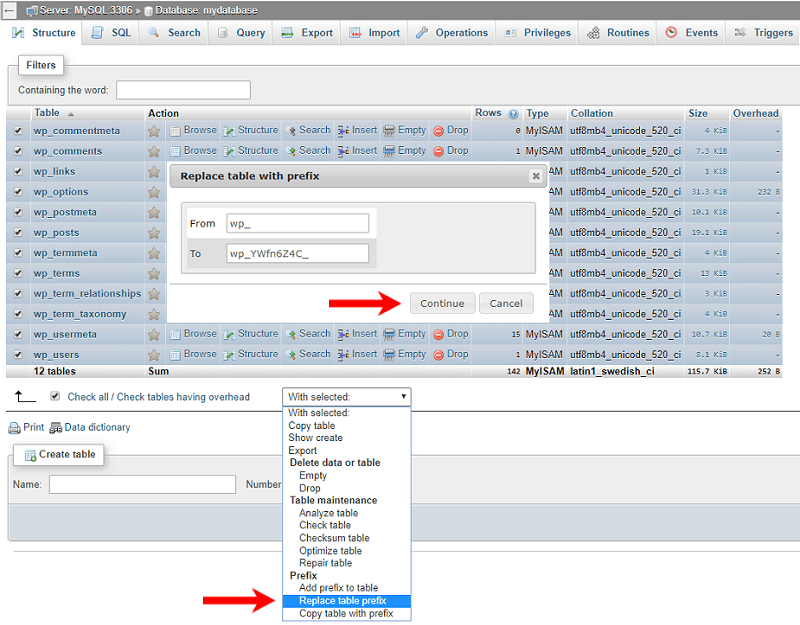
- Click the drop down list and select “Replace table prefix”.
This will bring up a box like the one shown below allowing you to change the database prefix for all selected tables.
In this picture, I have a brand new installation of WordPress and only the basic tables are shown. Chances are that you will have a lot more tables from plugins installed on your website. These will need to be changed as well.
Step 4: Edit the WordPress Options Table
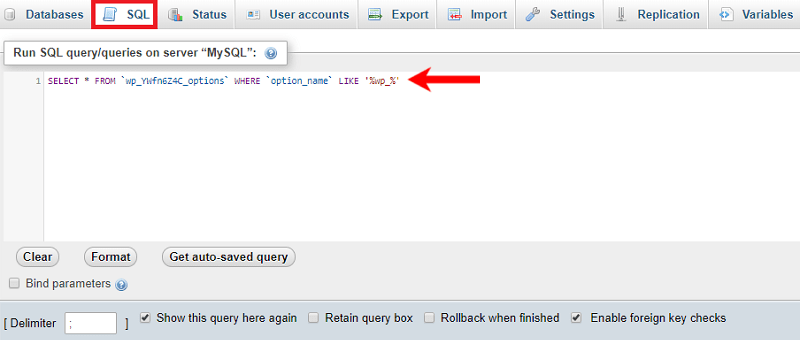
Now that we have renamed the main tables, we will need to search the options table for any instances of the default prefix. You can do this manually, but it is much easier to run an SQL query like the one shown below:
SELECT * FROM `wp_YWfn6Z4C_options` WHERE `option_name` LIKE '%wp_%'Running this SQL query will return the “wp_user_roles” and any other options that have been created by the plugins, custom scripts etc. Change the prefix of all options beginning with “wp_” to your new prefix. In our case that would be “wp_YWfn6Z4C_.”
Step 5: Edit the Usermeta Table
Similar to the previous step, you will also need to search the usermeta table for any instances of default prefix. Here is an SQL query that will help you do that:
SELECT * FROM `wp_YWfn6Z4C_usermeta` WHERE `meta_key` LIKE '%wp_%'The number of fields that you need to change will vary depending on how many plugins you use. Just as above, change the prefix of all usermeta beginning with “wp_” to your new prefix.
Step 6: Make Sure Everything is Working
That’s it! If you followed the steps above, your website should be good to go. To double check that everything works correctly, log in to your WordPress dashboard. Then, test out the admin panel and create a test post/page. Lastly, make sure all of your widgets and plugins work as they should.
Hopefully, this tutorial has helped you change your WordPress database prefix. If you run into any problems, let me know in the comments below. I will do my best to help walk you through it.
If you enjoyed this tutorial, please be sure to follow us on Facebook and Twitter. You can also find us on Freelancer if you need some help with your WordPress website or web development issues.


Thanks, this was great, but now wp-admin is not working haha. What should be used instead ? Let’s say my new prefix is “ted_rTU87Ey_”
Thanks,
Al
Thans a lot, this worked perfectly.
Thanks, David. It worked like a charm
Thanks man. This really helped a lot.